In public data collection (such as e-commerce price comparison, SEO ranking monitoring), QA automation regression, and AI Agent web interaction, Cloudflare Turnstile appears more and more frequently. It does not require users to do traditional grid selection; instead, it generates a one-time token (up to 2048 characters, valid for 300 seconds) on the front end through a browser environment challenge, which is then sent to the business backend to call Cloudflare's siteverify interface for verification.
Many development teams encounter a typical problem when integrating the Cloudflare Turnstile recognition API: the interface successfully returns a token, but after filling it into the form and submitting, the target site still reports a verification failure.
Excluding the case of treating full-page interception as a component (if you are still unsure whether the target site is a form component or full-screen interception, it is recommended to read "What's the Difference Between Turnstile and 5-Second Shield: Trigger Position, Credentials, and Automation Handling Explained"), the vast majority of "token but cannot pass" reasons lie in misjudgment of rendering mode, missing dynamic context parameters (such as action, cData), and front-end callback function not triggered.
This article will follow the real engineering chain to decompose the complete closed loop from parameter extraction, task submission, to result injection.
1. First Look at Rendering Mode: Differences in Parameter Extraction Between Implicit and Explicit Rendering
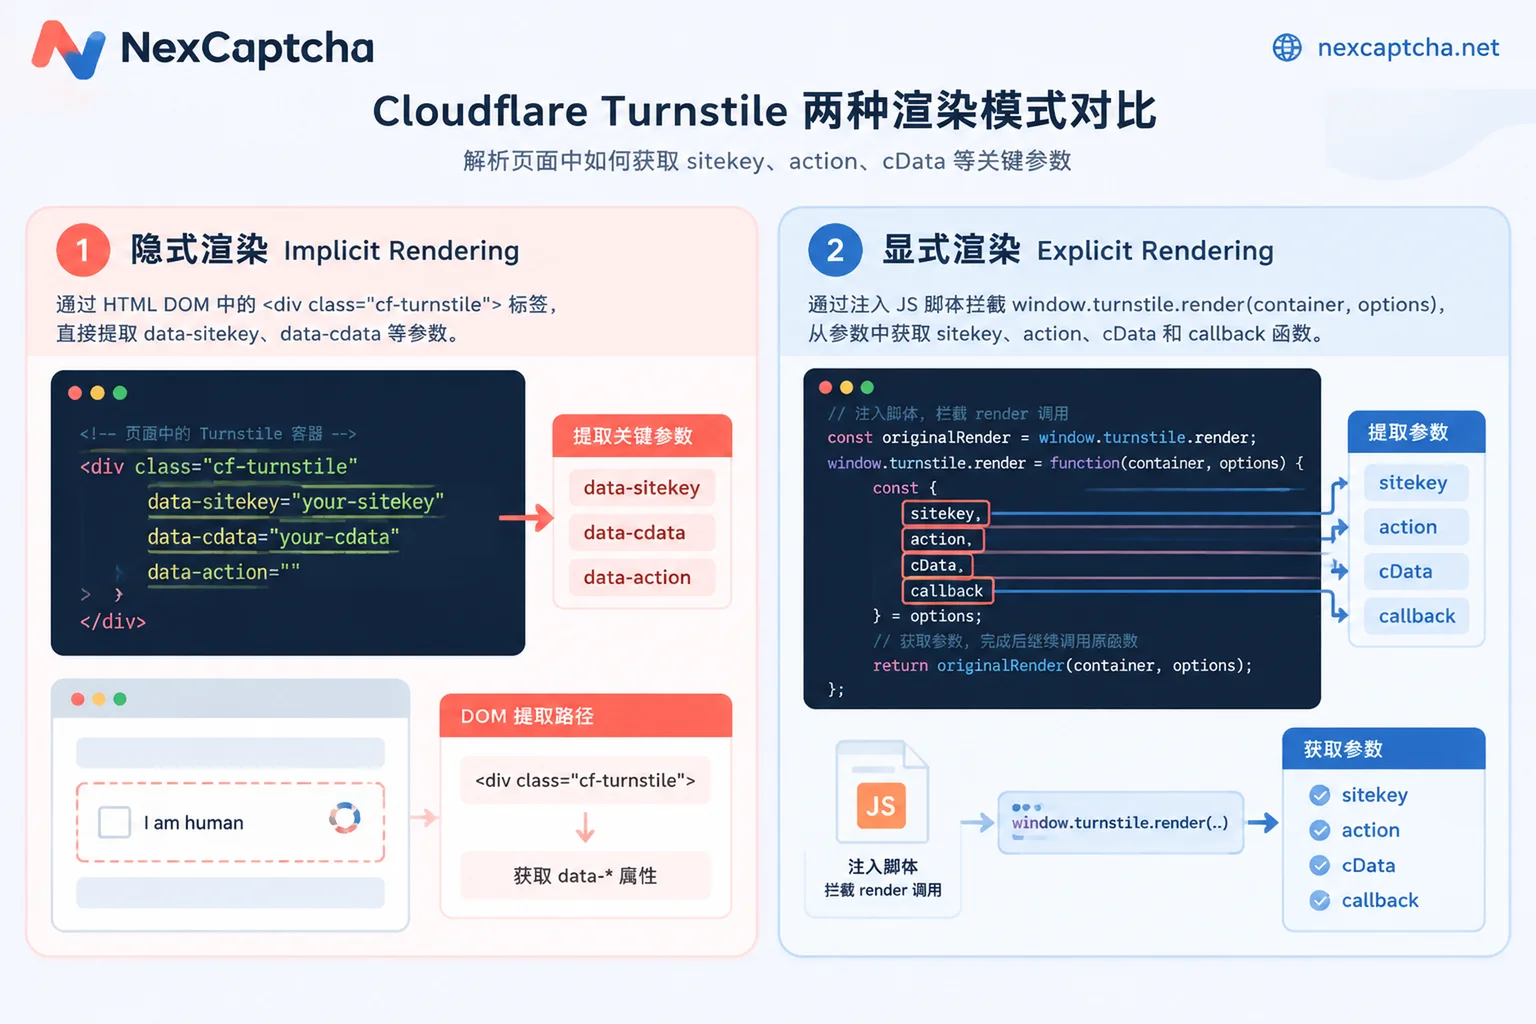
Cloudflare officially provides two ways to mount the Turnstile component: implicit rendering and explicit rendering. Before writing automation scripts, you must first identify which one the target page uses, as this directly determines where to get parameters.
1. Implicit Rendering: Directly Check DOM Attributes
Implicit rendering is mostly seen in traditional static forms. After the page loads https://challenges.cloudflare.com/turnstile/v0/api.js, the script automatically scans containers with the cf-turnstile class name, reads the data-* attribute on the HTML to complete initialization.
Inspect the form element in developer tools. If you see a structure similar to the following, you can directly read the attributes via selectors:
<div class="cf-turnstile"
     data-sitekey="0x4AAAAAAABUYP0XeMJF0xoy"
     data-action="login"
     data-cdata="session-89757-xyz"
     data-callback="onTurnstileSuccess">
</div>
At this point, the core fields you need to extract are in the tag attributes:
data-sitekey: The site's public key (required, usually starts with0x4).data-actionanddata-cdata: If these two attributes are present on the tag, be sure to extract them as-is; the reason will be explained later.
2. Explicit Rendering: Intercept turnstile.render Call
In single-page applications (SPA) such as React, Vue, or dynamic forms where a popup appears only after clicking a button, the DOM often contains only an empty container (sometimes not even data-sitekey), and the script tag usually has ?render=explicit or ?onload=... parameters. The component is dynamically mounted by front-end JS calling window.turnstile.render(container, options) at a specific time.
If you use conventional DOM search to grab parameters, it is easy to miss or overlook dynamically generated cData. In automation tools like Playwright or Puppeteer, the most reliable approach is to inject an initialization script (such as addInitScript or evaluateOnNewDocument) before page load, hook the turnstile.render method, and completely capture the passed options object:
// 在页面脚本执行前注入,拦截显式渲染参数与回调函数
(() => {
  let timer = setInterval(() => {
    if (window.turnstile && window.turnstile.render) {
      clearInterval(timer);
      const originalRender = window.turnstile.render;
      window.turnstile.render = function (container, options) {
        window.__interceptedTurnstile = {
          container,
          sitekey: options.sitekey,
          action: options.action || null,
          cData: options.cData || options['cData'] || null,
          chlPageData: options.chlPageData || null,
          callback: options.callback || null
        };
        // 如果不希望页面自己繼續跑验证,可在此直接 return 阻止默认渲染
        // 若需保留原组件外观,则调用 originalRender.apply(this, arguments)
        return originalRender.apply(this, arguments);
      };
    }
  }, 20);
})();
For more elegant management of such injection scripts in headless browsers, you can refer to our articles "How to Integrate Puppeteer Captcha API: From Parameter Extraction, Token Injection to Target Site Rejection Troubleshooting" and "How to Do Playwright Captcha Testing: Test Keys, Environment Isolation, and Real Captcha Integration".
2. Why Does Passing Only sitekey Get Rejected by the Target Site? Understanding action and cData
Many developers who have just transitioned from ordinary image captchas or early reCAPTCHA are used to passing only websiteURL and websiteKey (i.e., sitekey) to the captcha solving API. But in Turnstile, this is often not enough.
When the target website's backend takes the token you submitted and requests Cloudflare's https://challenges.cloudflare.com/turnstile/v0/siteverify, Cloudflare not only returns "success": true but also returns the hostname, action, and cdata bound to the token generation to the business backend:
action(action identifier): Used to distinguish whether the current verification occurs at "login", "checkout", or "search" stage.cData(Custom Data): Supports up to 255 characters. Many sites with higher security requirements put the current user's Session ID, form fingerprint, timestamp, or random number intocData.
Key conclusion: The recognition service itself does not know the verification logic of the target site's business backend. If the target site dynamically issues a cData bound to the current session when rendering Turnstile on the front end, and you omit this value when calling the recognition API, then the recognized token, although it can pass Cloudflare's cryptographic signature verification, will be directly deemed illegal and discarded by the business backend when comparing the cdata in the returned payload with the current session.
Therefore, as long as action, cData (or chlPageData) appear in the page (or turnstile.render interception result), they must be extracted in real time and passed together to the interface before each recognition task creation.
3. Integrating NexCaptcha for Turnstile Recognition
NexCaptcha provides a unified captcha recognition API, supporting mainstream types including Cloudflare Turnstile, reCAPTCHA v2/v3/Enterprise, Geetest v3/v4, DataDome, AWS WAF, etc. (For the full list, see the official captcha types page or console product catalog).
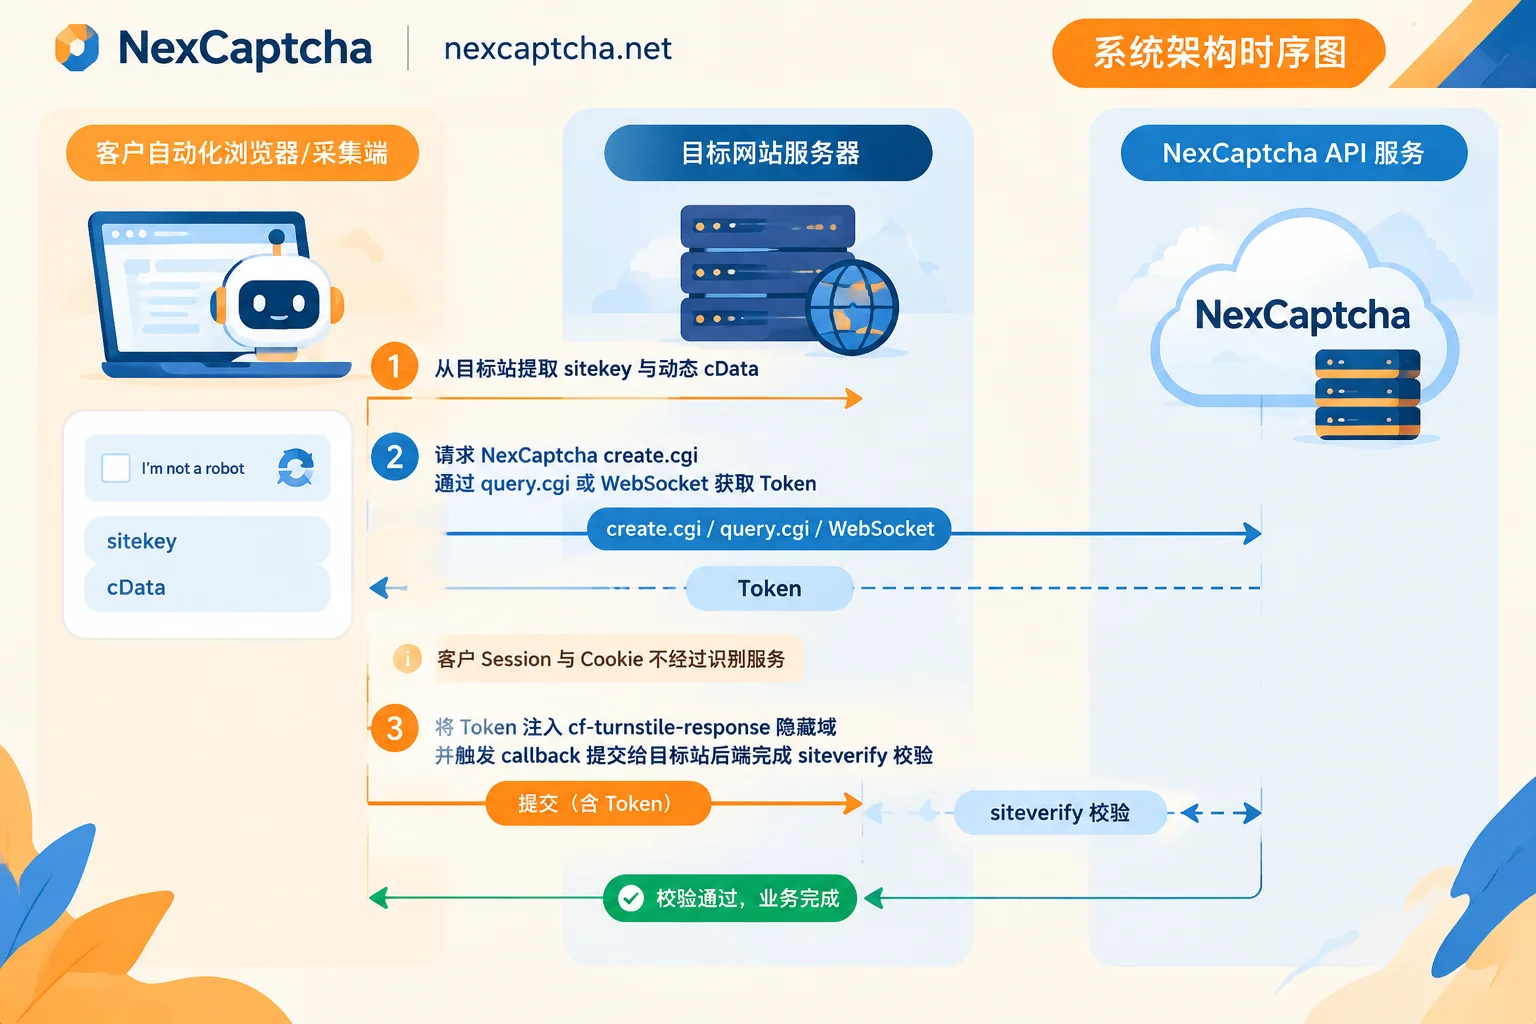
In terms of engineering architecture, NexCaptcha follows strict separation of responsibilities:
- Your target site requests, business session, and cookies do not pass through NexCaptcha servers.
- You only need to pass the extracted
websiteURL,websiteKey, and optional context parameters to the interface, and asynchronously retrieve the recognized token. - Finally, your own browser instance or HTTP session submits the token to the target site.
1. Interface Specification and Task Lifecycle
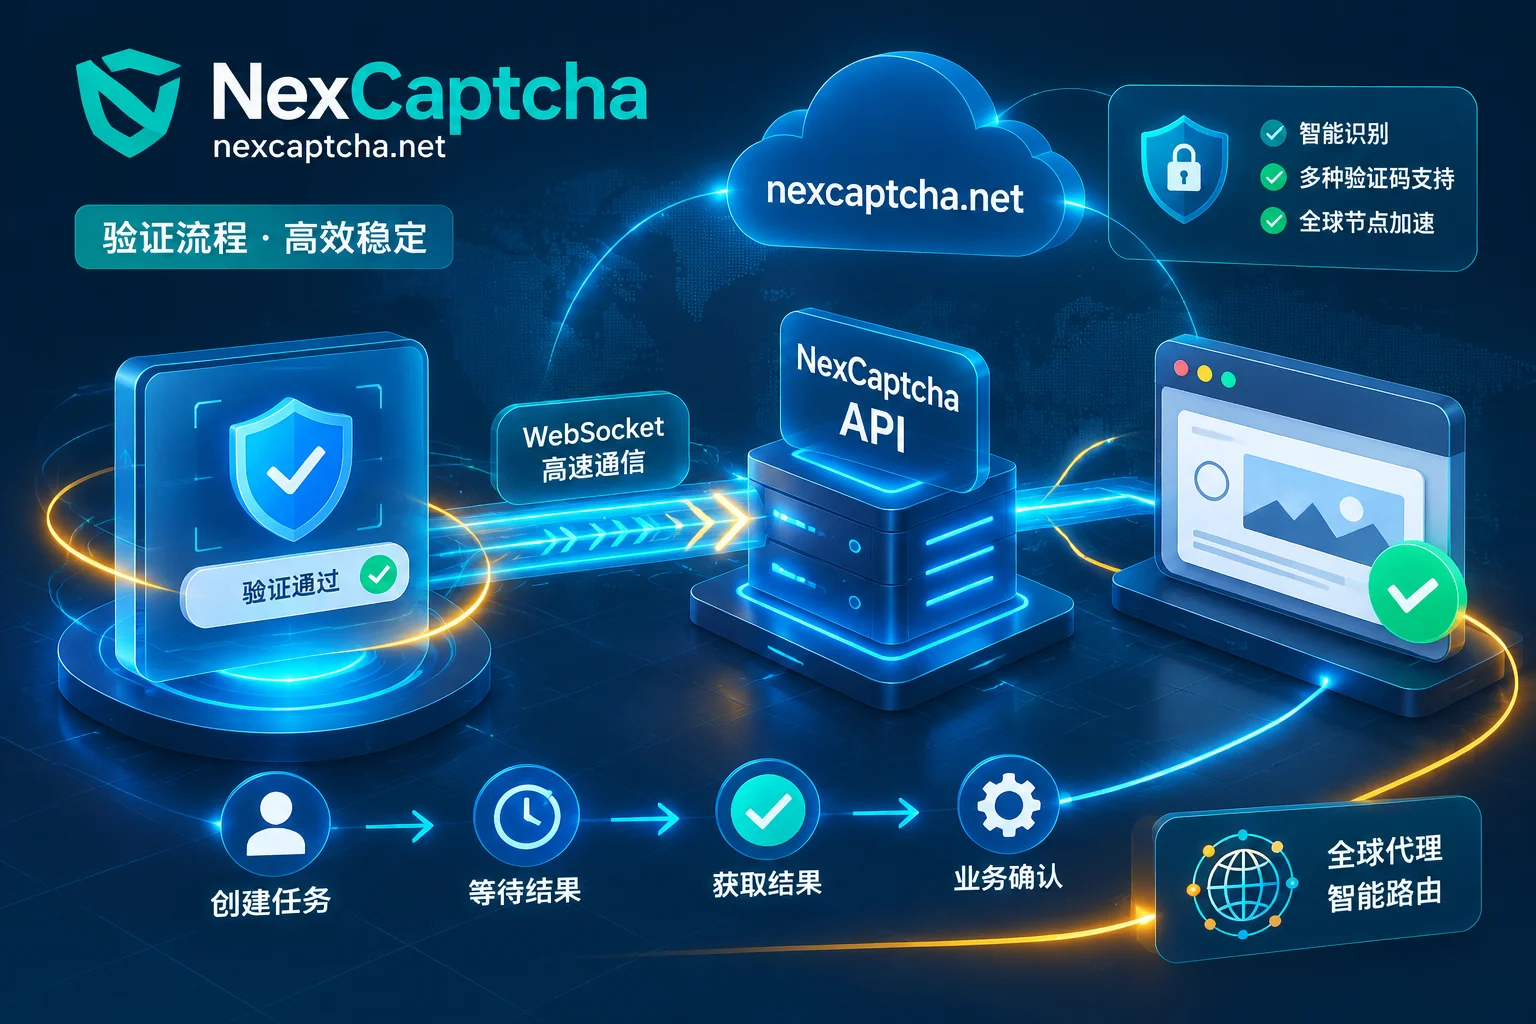
Unlike the traditional createTask/getTaskResult format on the market, NexCaptcha uses a unified create.cgi to create tasks, polls for results via query.cgi, or uses WebSocket real-time push to get results (for the trade-offs between these two result retrieval methods, see "What's the Difference Between Captcha API Polling and Callback: Process, Latency, Deployment Conditions, and How to Choose"; note that the interface uses query or WebSocket push, and does not have HTTP Webhook callback).
- Authentication: Place the API Key in the request header.
- Parameter structure: On the outer request, specify the Cloudflare Turnstile type by Product Code, and fill in the parameters for that type inside the
adapterobject. To facilitate teams migrating from platforms like 2Captcha, Anti-Captcha, or CapSolver, the interface documentation lists the corresponding common task type names under each type (such asTurnstileTaskProxyless/TurnstileTask), and the fields insideadapterfollow common naming conventions (such aswebsiteURL,websiteKey). - Proxy strategy: Supports no-proxy mode (using server-side proxy pool), and also supports passing your own proxy IP in
adapterto ensure the captcha solving exit is consistent with your business submission exit. - Billing and status: Tasks have four states: "processing", "success", "failure", and "expired". The system charges per task, and if the task fails or times out and expires, the fee will be automatically refunded to the account balance.
2. Online Testing and Code Integration Reference
Before writing code formally, you can first register on the console to get free test credits (no card binding required), and fill in your API Key and target site parameters in the Turnstile online test bench to intuitively run a real task.
Below is a Python skeleton for calling create.cgi and query.cgi (for specific request domain, complete product code, and adapter extended field names, please refer to the official interface documentation):
import time
import requests

API_KEY = "YOUR_NEXCAPTCHA_API_KEY"
BASE_URL = "https://app.nexcaptcha.net/openapi"  # 具体端点以官方文档为准

def solve_turnstile(page_url: str, sitekey: str, action: str = None, cdata: str = None):
    headers = {
        "Authorization": f"Bearer {API_KEY}",  # 请对照文档确认 Header 键名格式
        "Content-Type": "application/json"
    }

    # adapter 内部沿用通行字段写法
    adapter_params = {
        "websiteURL": page_url,
        "websiteKey": sitekey,
    }
    if action:
        adapter_params["action"] = action
    if cdata:
        adapter_params["data"] = cdata  # 对应 Turnstile 的 cData 上下文

    payload = {
        "product": "turnstile",  # 请以控制台产品目录及接口文档中的实际编码为准
        "adapter": adapter_params
    }

    # 1. 创建任务 (create.cgi)
    resp = requests.post(f"{BASE_URL}/create.cgi", headers=headers, json=payload, timeout=15)
    resp.raise_for_status()
    task_data = resp.json()
    task_id = task_data.get("taskId")

    # 2. 轮询结果 (query.cgi) —— 高并发场景建议改用文档提供的 WebSocket 推送示例
    for _ in range(30):
        time.sleep(2)
        q_resp = requests.get(
            f"{BASE_URL}/query.cgi",
            headers=headers,
            params={"taskId": task_id},
            timeout=10
        )
        res = q_resp.json()
        status = res.get("status")

        if status == "success":
            return res.get("solution", {}).get("token")
        elif status in ("failed", "expired"):
            raise RuntimeError(f"Turnstile task {status}: {res}")

    raise TimeoutError("Polling Turnstile token timed out")
If you prefer a complete language-level engineering wrapper, you can further read "Python Captcha Recognition API Integration: Task Submission, Polling, Exception Handling, and Result Injection" or "How to Integrate Node.js Captcha Recognition Interface: Task Submission, Polling, Error Handling, and Result Injection".
3. Quick Way for AI Assistants and Agent Teams: Hosted MCP Service
If your business is building AI Agents that can autonomously operate browsers (see "How to Handle Captchas for AI Agents: Tool Boundaries, Session Consistency, and Anti-Dead-Loop Design"), or if you are used to writing and debugging scraper scripts in Cursor, Claude Code, VS Code, Windsurf, or Gemini CLI, you can directly integrate the NexCaptcha hosted MCP service:
- Zero local deployment: Based on Streamable HTTP, authentication is done by filling in the API Key.
- Five built-in tools: Cover product list query, parameter model query (no need to manually check documentation for Turnstile's
adapterfield), task creation, task query, and balance query.
4. How to Submit After Getting the Token? Hidden Field Assignment and Callback Trigger
After receiving the token string returned by NexCaptcha, you must complete injection and trigger submission within 300 seconds (recommended within 120 seconds), and each token can only be validated once.
Depending on the target site's front-end implementation, injection is divided into two steps:
1. Fill in Hidden Form Field
When Turnstile is combined with an HTML form, it automatically generates a hidden <input> named cf-turnstile-response within the container (if the site has reCAPTCHA compatibility mode enabled, g-recaptcha-response may also exist). Execute a script in the browser context to assign the value:
function injectTurnstileToken(token) {
  // 1. 写入标准隐藏域
  const inputs = document.querySelectorAll(
    'input[name="cf-turnstile-response"], input[name="g-recaptcha-response"], textarea[name="cf-turnstile-response"]'
  );
  inputs.forEach(el => {
    el.value = token;
    el.dispatchEvent(new Event('input', { bubbles: true }));
    el.dispatchEvent(new Event('change', { bubbles: true }));
  });

  // 2. 如果之前通过 Hook 拦截到了显式渲染的 callback 函数,主动调用它
  if (window.__interceptedTurnstile && typeof window.__interceptedTurnstile.callback === 'function') {
    window.__interceptedTurnstile.callback(token);
  }
}
2. Why Actively Trigger callback?
In modern front-end frameworks (React / Next.js / Vue), form submission often does not rely on traditional <form action="..."> page refresh; instead, the token is stored in the component's state, and the "submit" button is set to disabled.
Only when Turnstile's callback(token) is called will the front-end state machine write the token into memory and unlock the submit button. If you only modify the <input name="cf-turnstile-response"> in the DOM without triggering the callback, the turnstileToken field in the data packet sent when clicking submit will most likely still be empty.
5. Still Verification Failure After Token Submission? Four-Step Troubleshooting Checklist
If the target site still rejects the request after completing the above injection, you can quickly locate the issue in the following order (for a more systematic general troubleshooting framework, see "How to Troubleshoot Verification Failure After Captcha Token Return: Time Efficiency, Parameters, Injection, Score, and IP Layer-by-Layer Location"):
- Check the extraction timing of dynamic
cData: Some websites'cDatachange dynamically with each render. Do not hardcode acDataseen in a single packet capture; you must intercept and submit in real time within the current page lifecycle. - Check proxy IP and
remoteipvalidation: Cloudflare'ssiteverifyinterface allows the target site backend to passremoteip(visitor IP) for comparison. If the target site validates strictly, it is recommended to pass the proxy IP used by your current automation session when calling the NexCaptcha interface, and keepUser-Agentconsistent. - Check for duplicate submission or timeout: Turnstile token is strictly single-use. If your front-end script automatically sends a request in
callbackand then manually clicks the submit button again, the second request will inevitably triggertimeout-or-duplicateerror. - Dual-run reconciliation during platform migration: If you are switching from another captcha platform to NexCaptcha, due to different outer interface formats and authentication methods, after rewriting the adapter, it is recommended to first run dual traffic on a small percentage, compare recognition time, target site pass rate, and real effective cost on both sides, and then switch full traffic after the data is fully aligned.
Conclusion and Start Testing
The core of handling Cloudflare Turnstile recognition is not complex image cracking, but precise decomposition of the front-end rendering chain: distinguish implicit and explicit rendering, intercept sitekey / action / cData in real time, obtain the token via a highly available API, and then accurately call back to the front-end state machine.
If you are looking for a stable, transparently billed captcha recognition solution for public data collection, automation testing, or AI Agents:
- Go to the NexCaptcha registration page now to get an API Key and free test credits (balance never expires, no monthly fee or minimum consumption, supports Alipay, WeChat, USDT, and corporate transfer; see pricing for details).
- Check the OpenAPI documentation or try the online test bench built into the console.
- For special site parameter extraction or bulk migration issues, you can always communicate directly with the technical team via Telegram support (@nextipkf).