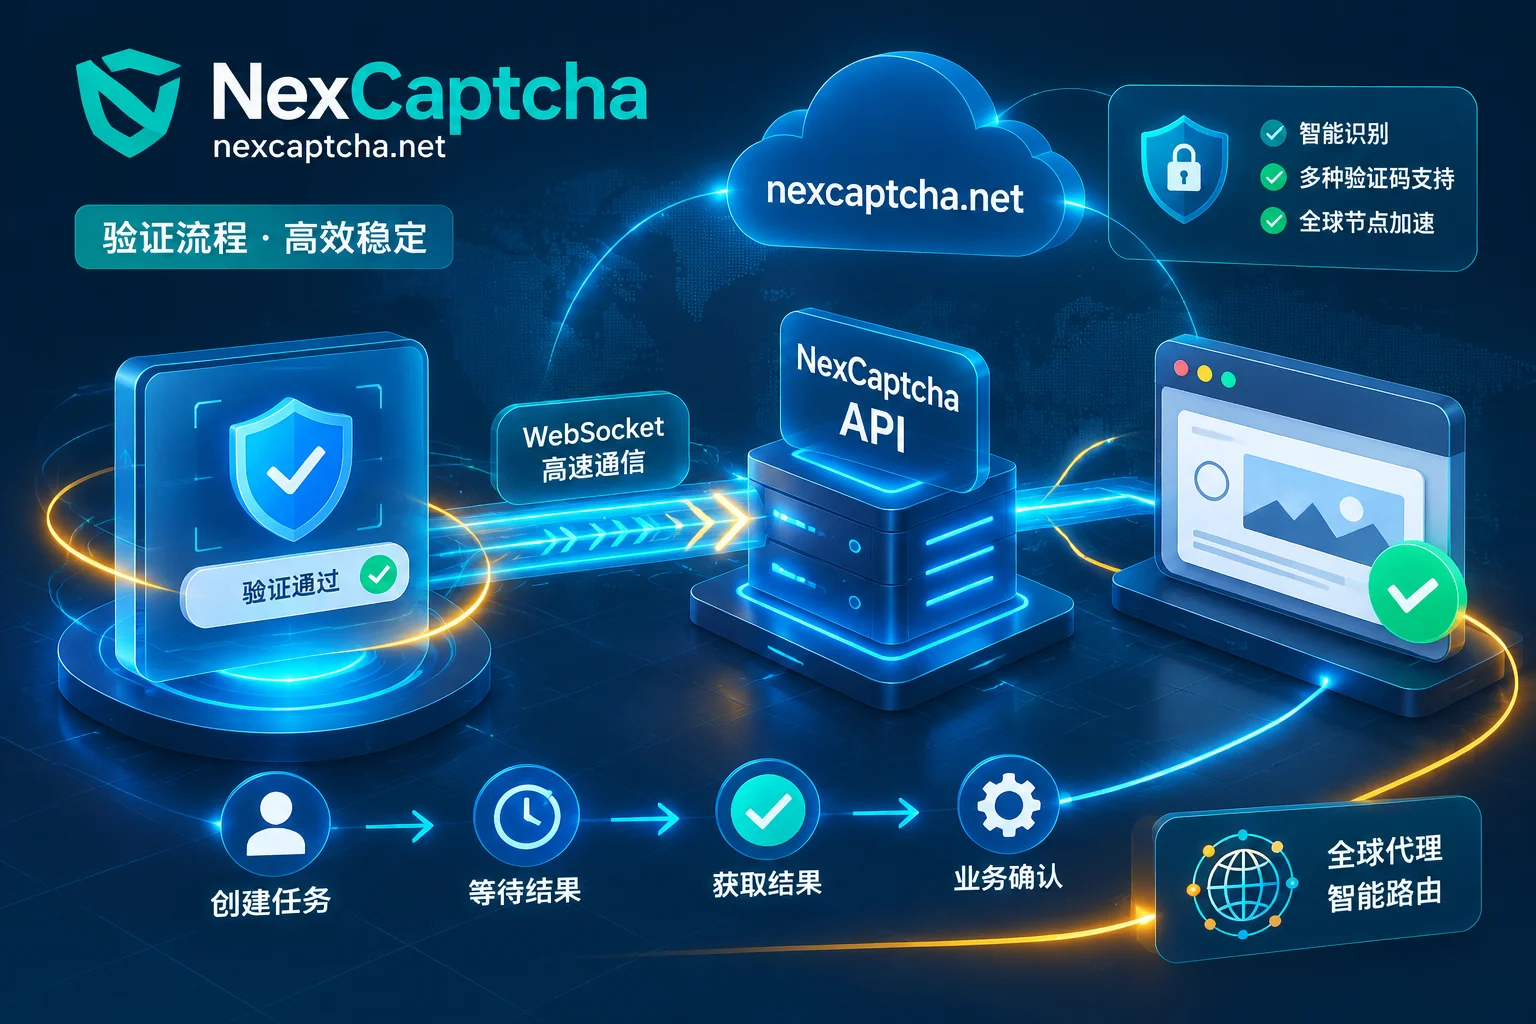
Integrating a CAPTCHA recognition API in a Puppeteer automation flow is essentially about having an external REST API solve the CAPTCHA, then using Puppeteer to inject the result into the page and complete the submission. This is not simply "call the API and get a token." It involves five stages: dynamic parameter extraction, asynchronous polling, DOM injection, frontend callback triggering, and session validation. A common engineering issue is that the CAPTCHA API returns success, yet the target site's backend still rejects it—often due to token expiry, IP mismatch, automation fingerprinting, or un-triggered frontend events.
Standard Integration Architecture Between Puppeteer and a CAPTCHA API
Puppeteer itself does not handle CAPTCHA recognition, and a CAPTCHA REST API does not directly control the browser. The integration follows an "out-of-band recognition + result backfill" pattern:
- Puppeteer extracts parameters: After the page loads, use
page.evaluate()orpage.$eval()to obtain runtime parameters of the CAPTCHA component, such as reCAPTCHA'sdata-sitekey, hCaptcha'sdata-sitekey, Turnstile'sdata-sitekey, and the current page URL. - Call the CAPTCHA API: Send these parameters via an HTTP request to a CAPTCHA recognition service (e.g., NexCaptcha's
api.nexcaptcha.net/createTaskendpoint), create an asynchronous task, and obtain ataskId. - Poll for task results: Request the
getTaskResultendpoint at fixed intervals (typically 1–3 seconds) until the status becomesreadyand returns a token string insolution.gRecaptchaResponseor the corresponding field. - Puppeteer injects the token: Use
page.evaluate()to write the token into a hidden page field (e.g.,#g-recaptcha-response), and execute the page-registered callback function or dispatch DOM events so the frontend framework recognizes that verification is complete. - Submit the form and validate: Puppeteer triggers the form submission or clicks the button, and the target site's backend validates the token and session consistency.
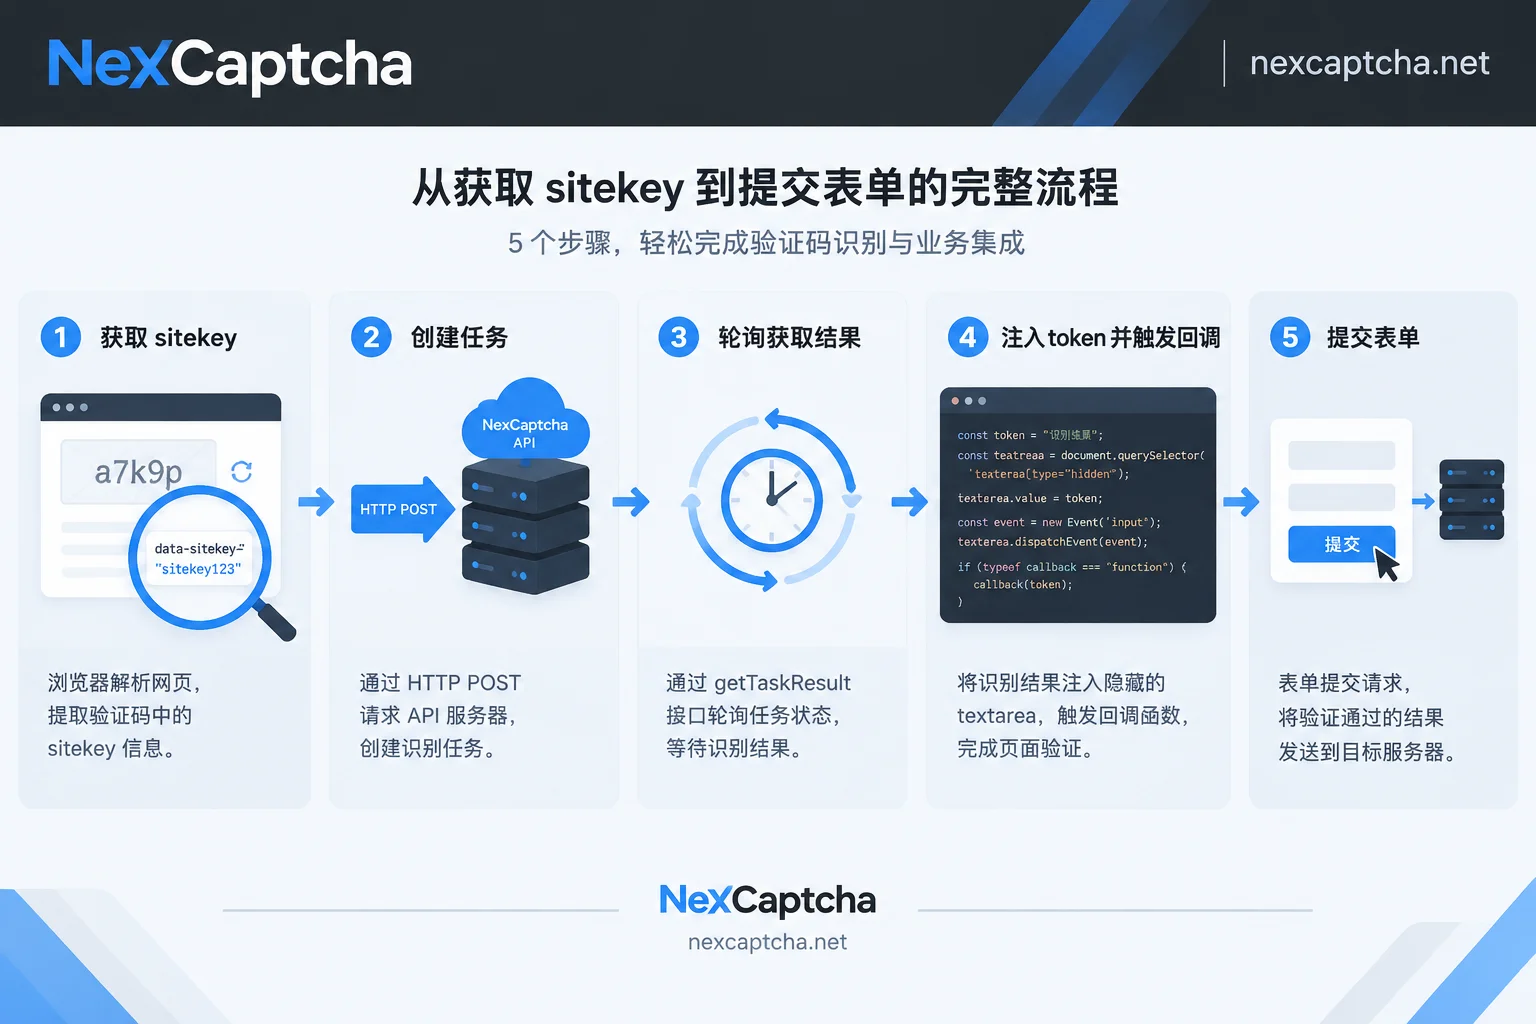
In this flow, "the CAPTCHA API returns a token" is only an intermediate step. Final success depends on whether the target site's backend accepts that token and the session state.
Standard Integration Code Example
The following example shows how to connect to a generic CAPTCHA recognition REST API in Puppeteer (using reCAPTCHA v2 as an example). It uses standard fetch calls and does not depend on a specific vendor's SDK.
const puppeteer = require('puppeteer');

(async () => {
  const browser = await puppeteer.launch({ headless: false });
  const page = await browser.newPage();

  // 访问目标页面
  await page.goto('https://example.com/login', { waitUntil: 'networkidle2' });

  // 1. 提取验证码参数
  const sitekey = await page.$eval('.g-recaptcha', el => el.getAttribute('data-sitekey'));
  const pageurl = page.url();

  console.log('提取参数:', { sitekey, pageurl });

  // 2. 创建验证码任务
  const createTaskResponse = await fetch('https://api.nexcaptcha.net/createTask', {
    method: 'POST',
    headers: { 'Content-Type': 'application/json' },
    body: JSON.stringify({
      clientKey: 'YOUR_API_KEY',  // 替换为测试密钥
      task: {
        type: 'RecaptchaV2TaskProxyless',
        websiteURL: pageurl,
        websiteKey: sitekey
      }
    })
  });

  const createTaskData = await createTaskResponse.json();
  if (createTaskData.errorId !== 0) {
    throw new Error(`任务创建失败: ${createTaskData.errorDescription}`);
  }

  const taskId = createTaskData.taskId;
  console.log('任务已创建:', taskId);

  // 3. 轮询任务结果
  let token = null;
  let attempts = 0;
  const maxAttempts = 60;  // 最多轮询 60 次(约 2 分钟)

  while (attempts < maxAttempts) {
    await new Promise(resolve => setTimeout(resolve, 2000));  // 等待 2 秒

    const getResultResponse = await fetch('https://api.nexcaptcha.net/getTaskResult', {
      method: 'POST',
      headers: { 'Content-Type': 'application/json' },
      body: JSON.stringify({
        clientKey: 'YOUR_API_KEY',
        taskId: taskId
      })
    });

    const resultData = await getResultResponse.json();

    if (resultData.status === 'ready') {
      token = resultData.solution.gRecaptchaResponse;
      console.log('Token 已获取:', token.substring(0, 50) + '...');
      break;
    } else if (resultData.status === 'processing') {
      attempts++;
      console.log(`第 ${attempts} 次轮询,任务处理中...`);
    } else {
      throw new Error(`任务失败: ${resultData.errorDescription}`);
    }
  }

  if (!token) {
    throw new Error('轮询超时,未获取到 Token');
  }

  // 4. 注入 Token 到页面
  await page.evaluate((token) => {
    // 填充隐藏字段
    document.getElementById('g-recaptcha-response').value = token;

    // 触发前端回调(如果页面定义了 data-callback)
    const recaptchaElement = document.querySelector('.g-recaptcha');
    const callback = recaptchaElement?.getAttribute('data-callback');
    if (callback && typeof window[callback] === 'function') {
      window[callback](token);
    }
  }, token);

  console.log('Token 已注入页面');

  // 5. 提交表单
  await page.click('#submit-button');
  await page.waitForNavigation({ waitUntil: 'networkidle2' });

  console.log('表单已提交,当前 URL:', page.url());

  await browser.close();
})();
This code demonstrates the standard flow, but real-world projects need to handle many more edge cases.
Token Injection Is More Than Filling a Field
Many developers only perform this step when injecting a token:
await page.evaluate((token) => {
  document.getElementById('g-recaptcha-response').value = token;
}, token);
As a result, after clicking submit, the frontend still shows "Please complete the verification first." The reason is that modern web applications (especially those using React, Vue, etc.) do not listen for direct DOM assignments; they rely on events or callbacks to notify components of state changes.
Three Mechanisms You Must Trigger
- Execute data-callback: reCAPTCHA, hCaptcha, and Turnstile components can specify a callback function in HTML attributes, such as
<div class="g-recaptcha" data-callback="onCaptchaSuccess"></div>. After injecting the token, find and execute that function inpage.evaluate:
const callback = recaptchaElement?.getAttribute('data-callback');
if (callback && typeof window[callback] === 'function') {
  window[callback](token);
}- Dispatch DOM events: If the page listens for
inputorchangeevents viaaddEventListener, you need to dispatch them manually:
const textarea = document.getElementById('g-recaptcha-response');
textarea.value = token;
textarea.dispatchEvent(new Event('input', { bubbles: true }));
textarea.dispatchEvent(new Event('change', { bubbles: true }));- Call the CAPTCHA SDK method: Some sites call
grecaptcha.getResponse()after obtaining a token to check status; in this case, you can override that method:
window.grecaptcha.getResponse = () => token;If you are unsure which mechanism the target site uses, before injecting, open the browser developer tools and observe when the submit button's disabled attribute is removed, or whether the form's onsubmit event has a verification check bound to it.
Why the API Returns Success but the Target Site Still Rejects
Even if the CAPTCHA recognition API returns a valid token, the target site's backend validation may still fail. This is because CAPTCHA vendors (such as Google, Cloudflare) do not only check the token itself during server-side validation; they also inspect the request context.
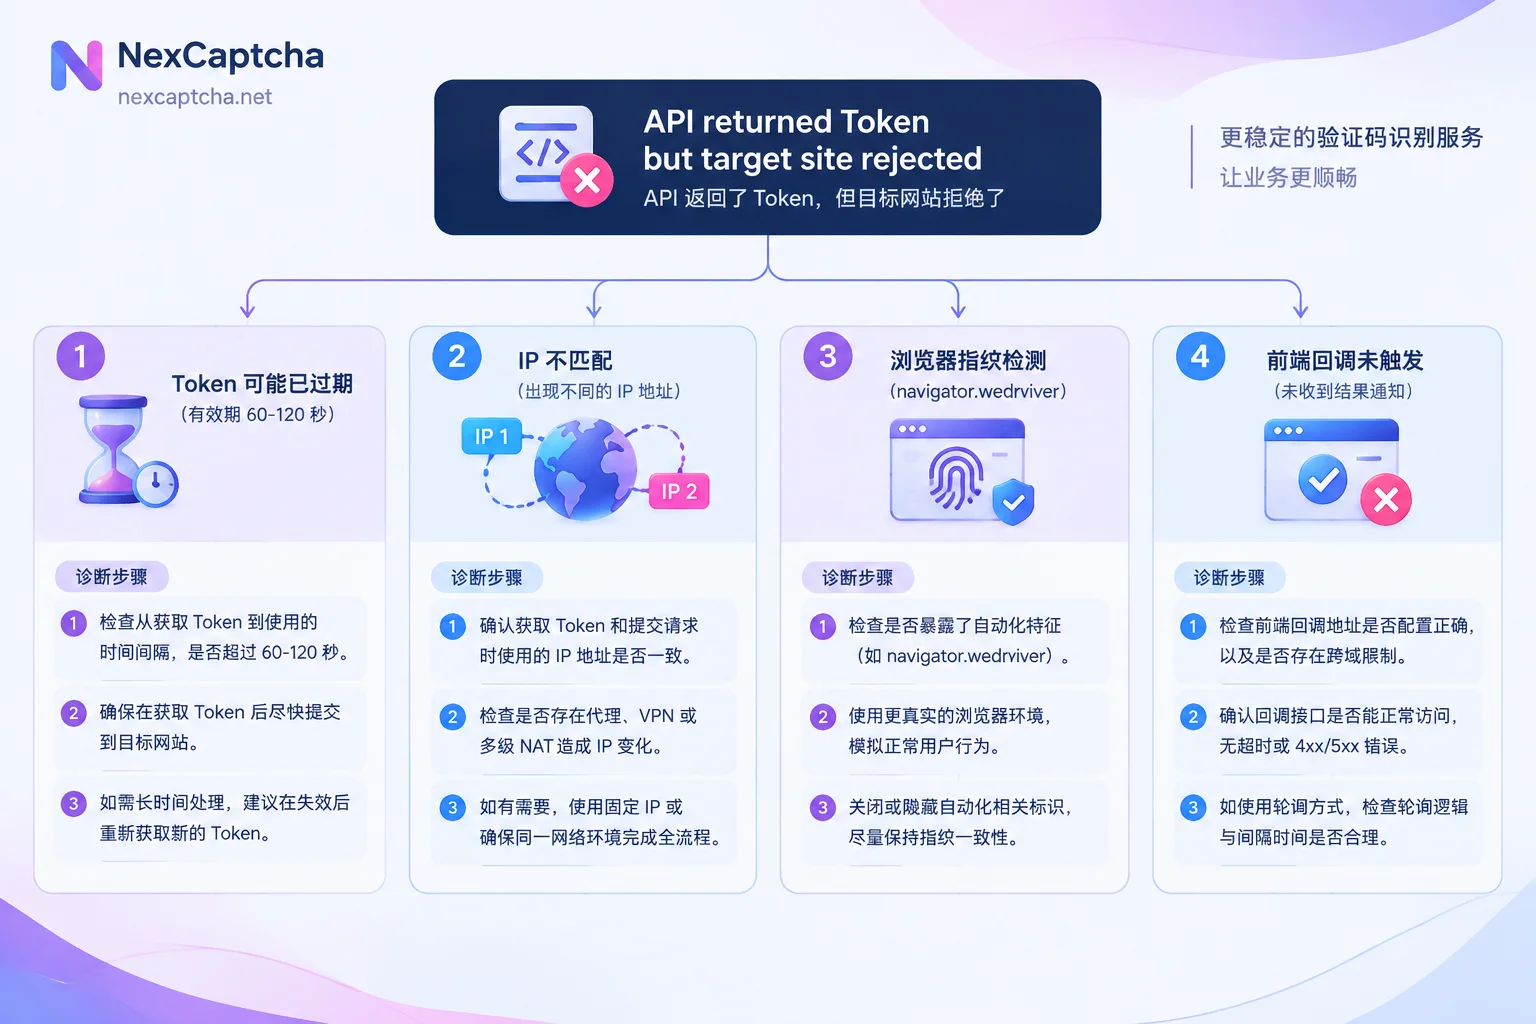
1. Token Expiry
reCAPTCHA, hCaptcha, and Turnstile tokens typically expire in 60–120 seconds. If, after calling the CAPTCHA API, network delays, slow page loads, or business logic waits cause too long an interval between injection and submission, the token may expire before reaching the server and be rejected outright.
Troubleshooting method: Record timestamps in the Puppeteer flow and confirm the time elapsed between getTaskResult returning the token and page.click() submitting it. If it exceeds 90 seconds, consider moving the CAPTCHA solving step later, or re-solving before submission.
2. IP Address Mismatch
Some CAPTCHA vendors validate whether the IP used to solve the token matches the IP used to submit the form. If the solving node IP of the CAPTCHA API provider differs from the proxy IP used by the Puppeteer instance, the backend may consider the token stolen.
Solutions:
- Use a CAPTCHA API that supports custom proxies (task type names usually include the
Proxykeyword; pass parameters such asproxyType,proxyAddressin the request) so that the solving request goes through the same proxy node as Puppeteer. - Alternatively, do not use a proxy in Puppeteer and access the target site directly with your local IP, while having the CAPTCHA API solve from the same IP.
3. Automation Fingerprint Exposure
Puppeteer by default exposes navigator.webdriver = true in the browser environment, and many sites detect this property and lower trust scores. For systems like reCAPTCHA v3 that return a score (0.0–1.0) rather than a simple pass/fail, automation fingerprints can cause the score to be too low, and business logic rejects the request.
Mitigation methods:
- When launching Puppeteer, use the
puppeteer-extraplugin (e.g.,puppeteer-extra-plugin-stealth) to hide automation features:
const puppeteer = require('puppeteer-extra');
const StealthPlugin = require('puppeteer-extra-plugin-stealth');
puppeteer.use(StealthPlugin());

const browser = await puppeteer.launch({ headless: false });- Or inject a script before page load to override the property:
await page.evaluateOnNewDocument(() => {
  Object.defineProperty(navigator, 'webdriver', { get: () => false });
});
4. Frontend Callback Not Triggered
Even if the token is correctly filled into <textarea>, if the frontend framework's state management does not perceive the change, the submit button may remain in a disabled state, or the form validation logic may consider verification incomplete. In this case, clicking submit pops up a prompt on the spot instead of sending a request to the backend.
Diagnostic steps: Before page.click() submission, use page.evaluate() to check the submit button state:
const isDisabled = await page.$eval('#submit-button', btn => btn.disabled);
console.log('提交按钮是否禁用:', isDisabled);
If it is still true, the frontend has not perceived the token injection, and you need to go back to the "trigger callback or dispatch event" step to add code.
Handling Differences for Invisible CAPTCHAs
reCAPTCHA v3 and some Turnstile configurations have no visible checkbox or challenge interface. Instead, they automatically execute grecaptcha.execute() or turnstile.render() on page load or user interaction, and silently submit after returning a token. Such scenarios cannot be handled by a simple "extract parameters → solve → inject" flow.
Two Approaches for v3
- Intercept and replace the execution result: Before page load, override the
grecaptcha.executemethod so it directly returns the token you obtained from the CAPTCHA API, without actually requesting Google:
await page.evaluateOnNewDocument((presolvedToken) => {
  window.grecaptcha = {
    execute: () => Promise.resolve(presolvedToken)
  };
}, token);
This approach requires injection before page initialization, and the token must be solved in advance.
- Combine with fingerprint spoofing to lower risk scores: If the target site has low requirements for v3 scores (e.g., only rejecting requests below 0.1), hiding automation features and using residential proxies can allow Puppeteer to normally trigger
execute()and obtain a sufficiently high score without calling an external CAPTCHA API.
For Cloudflare managed challenges (UAM or Managed Challenge), Puppeteer is similarly difficult to handle directly, and usually requires undetected-chromedriver or a dedicated Cloudflare bypass service.
Choosing a CAPTCHA API Suitable for Puppeteer
When selecting a CAPTCHA recognition service, besides the supported CAPTCHA types, consider the following engineering factors:
- Task type completeness: Whether both Proxyless and Proxy task types are provided. The former is suitable for local IP testing, while the latter is suitable for large-scale proxy pool scenarios.
- Polling endpoint stability: Whether the API rate-limits under high-frequency polling, and whether the response structure is consistent.
- Token validity guarantee: Whether the provider's solving latency (P50/P95) can ensure the token does not expire before injection.
- Failure refund policy: Whether billing is based on submission failure or task creation. The difference matters if the target site rejects after token injection—will you be charged?
NexCaptcha provides a unified REST API for handling reCAPTCHA v2/v3, hCaptcha, Turnstile, GeeTest, and more. The task mode uses standard createTask + getTaskResult polling or webhook callbacks, bills per thousand successful recognitions, and offers refunds for failures. In Puppeteer automation projects that need to support multiple CAPTCHA types simultaneously, a unified interface reduces integration effort. For specific task parameters, latency data, and pricing, see the NexCaptcha homepage.
Practical Engineering Considerations
- Do not wait too long after solving the token: Once polling returns a token, inject and submit immediately to avoid spending time on other page operations (e.g., filling forms, uploading files). If business logic requires completing other steps first, perform CAPTCHA solving as the last step.
- Distinguish error sources in handling:
createTaskreturningerrorIdindicates a parameter error or insufficient balance;getTaskResultreturningstatus: failedindicates solving failure (e.g., CAPTCHA load failure, target site rejection); an error from the target site after submission indicates token validation failure. The retry strategies for these three differ. - Avoid sharing Page instances concurrently: If using Puppeteer for batch tasks, each task should use an independent
pageinstance to avoid token injection overwriting each other. - Separate test and production environments: During development, use the CAPTCHA API's test key; before production launch, switch to the official key and validate with small traffic. Some providers' test keys can only solve specific demo sites and do not support real business domains.
Integrating Puppeteer with a CAPTCHA recognition API is essentially asynchronous task coordination. The key is understanding the boundary between "recognition success" and "business pass," and correctly triggering frontend state updates during injection. Following the standard flow and troubleshooting layer by layer can cover most CAPTCHA scenarios.